Sunday, June 30, 2013

Sewing Tutorial: Fitted Bassinet Sheet

What you need:
Fabric
Complimentary or Contrasting Thread
Sewing Machine
Needle
Elastic
Measuring Tape
Safety Pin
Pins
Iron

  
Difficulty:
Easy

Time:
About an hour

First, select your fabric. You can buy new material or use second hand, depending on what you like and how lucky you get if you're thrifting. If you have a nice sheet that you don't use anymore, you can also cut this up and make about four sheets with it, usually with some to spare. I've used flannelette for mine but plain cotton works beautifully too. You might want to measure your bassinet mattress before you go shopping to see exactly how much you will need, but I took the lazy approach and estimated when I was in the store; the excess has been used to make reusable wipes.


Wash and dry the fabric first up if it's new to allow for any shrinkage - you don't want to make the sheet to size only to find out it shrinks too small after it's first cleaning session. You can then iron the fabric to make it nice and flat and easy to use.

Now, to get the fabric size that you need, you can do this one of two ways. If you want to know the size you need before you go shopping, you'll need to do some measuring. Find out the length and the width of your mattress first of all. Then, measure the depth of the mattress, add this twice (once for each side) to the above numbers. Finally, add at least 10cm to each side of this (20cm all up) to allow for the seams and cloth that will gather underneath the mattress. 
So if your mattress is 90cm long x 45cm wide x 5cm deep, then the size you need would be:
Length 90cm + 10cm + 20cm = 120cm
Width 45cm + 10cm + 20cm = 75cm

If you already have your fabric, you can lay down the mattress and add the depth of the mattress plus 10cm to it. In the case of the measurements above, you would need to measure out 15cm on each side of the mattress to get the right size.
*Note* You can add more than 10cm for seams and gathering if you like, depending on how much you would like it to gather underneath. 

To get the corners curved, I simply marked out a few points using the ruler and drew a curve free hand. Once the sewing is all completed, you won't notice if you've done a slightly dodgy job with this!


Lightly trace around this shape using chalk and cut it to size. 


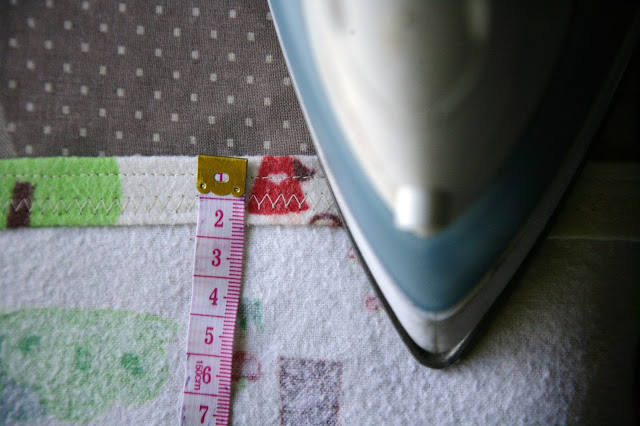
Fold over approximately 1cm of fabric all the way around the edge and iron it flat. You can mark the distance with chalk but I did this by eye. You can pin the areas where there are little folds to ensure that the sewing goes easier there, and it's worth noting that I iron around the seam in the same direction that the sewing machine will go around it. This is so that the folds are all going in the same direction and will be easy for the machine to run over them - if you iron in the opposite direction, it will be a bit of a pain to sew over each one, as they will try to fold back the other way. Thenzig zag stitch to finish it off. 

*Note* This step is optional. I like to have the sheet double hemmed to make it look nice and neat and 'finished', but you can leave it out if you want to save time or if you're worried your fabric won't be big enough and you don't have that cm to spare. 


Fold over another 1.5 - 2 cms all the way around and iron flat. Again - you can mark the distance with chalk, but I did it freehand.


The important thing to remember here is that you will need to fit your elastic in the gap that is left after you sew a seam, so if you've bought wider elastic then you may need to make a wider seam. You can pin the little folds in the corners again, which I definitely recommend for this seam as it will be the one that you see once the product is finished - may as well make it nice!


Sew around the seam with a straight stitch, nice and close to the edge (furthest from the fold) leaving an unsewn gap big enough for you to slip the elastic into later - about 5cms is plenty. Optional: Go around again with a zig zag stitch, to reinforce it and to cover up any dodgy sewing (which is bountiful in my sheet!) again making sure you leave the gap to put the elastic through. 

The amount of elastic you need can depend on how much excess fabric you added to your measurements at the beginning, and how tightly you would like the sheet to fit. As a rule of thumb, I measure out the elastic to be as long as the longest length of fabric. Mark this length with a pen, but do not cut it. Feed elastic through the gap that you've left with a safety pin. When you get to the other side, pin the safety pin securely to the hem of the fabric and stretch the other end of the elastic until your mark comes out. Pin the marked end of the elastic to the other end of the elastic using a new safety pin. The first time I made one of these I tried to use the same safety pin for both ends, and of course, because the elastic was taught, it slipped straight off the safety pin and I was stuck trying to fish it out from my hem without the safety pin to help me - let my mistake be a lesson to you!


Now you can test out the sheet on your mattress; if you need to tighten it or loosen it out more, do this now by simply feeding more of the elastic through or pulling more out. This is why it's important not to cut your elastic prematurely - it's easy to adjust the length to make it perfect for your mattress. 


Once you have the elastic length that you want, hand sew the ends together securely. Once your elastic has been firmly sewn together, you can trim the excess off. I found it helpful here to safety pin the elastic to the hem on each side so that it was nice and slack in the middle - it's much harder to handle when the elastic is stretching taut. I've tried to show this in the photo below:


Once this is done, remove your safety pins and sew the opening of the hem closed using the same stitches that you used before (remembering, I used a straight stitch then went over it with a zig zag stitch). Trim all of your threads and move the cloth around the elastic so that it's gathered evenly all the way around.


HAPPY DAYS!


Please let me know if you have any feedback on this tutorial, or if you need any clarification on what I've written!

Monday, June 24, 2013

DIY Scrap Fabric Headband or Belt

The following is a tutorial I made for an older blog that I had planned to start up. It's pretty basic - and comes from a time when I didn't own a sewing machine - but I thought I would pop it up in case you find it handy. Enjoy!

DIY Scrap Fabric Headband or Belt

There's an amazing place near my house called Reverse Garbage. They are basically up-cycling embodied: they collect 'high quality industrial discards' (aaaall kindsa crazy awesome junk) and sell it for low prices to the public. They also run workshops, talks and tours, and have a small gallery filled with upcycled goods from local artisans, crafters and designers.


I made my way in there for the first time last week, and was a little overwhelmed by all the 'stuff' they had! I decided to keep it simple and made a bee-line for the scrap fabric pile. I found two adorable patterned pieces for 20 cents each, and walked out happy as Larry after barely dinting my small-change fund...


The first was this pretty pink spotty number. in a great textured cotton fabric that's about 80cm long and 7cm wide. I figure I can use it as a natty headband in the summertime, to match my lazy sundresses. It's a little rough around the edges, but not so much that I need to do anything with it, really; just pluck the stray strings off, and it's good to go!


The second piece is a bit more interesting. The pattern is AMAZING, this beautiful Cath Kidson-esque stripy floral design. It also measures up at 7cm wide and OVER THREE METRES long. Whaaat the hell was I going to do with it? It's also overlocked down the one edge, with a shiny, synthetic lining still attached to it. 


There's so much of this stuff, I figure I can go a bit wild and experiment with a few things. Woo hoo, craaaazy experimental crafternoons ahoy! No seriously, though, I'm not very good at DIY, but I WANT to be, so this is the perfect scrap of material for me to start practising with. It's cheap, there's plenty of it, and I have to be creative to work with the constraints of it's strange shape. Another small issue: I don't own a sewing machine. Which means that any sewing that I'm going to do - for the meantime at least - is going to have to be by hand. Fun!


Because I can be pretty unimaginitive, the first thing I thought to do was to tie it in my hair (yup, just like I did with the other piece of fabric...). Like I said before, I love the pattern, but I can't just cut off a length like the other scrap I have and chuck it on my head. First of all, the other fabric has the pattern on both sides, so if it moves around a little in my hair, you won't notice the ugly white backside of the material. This stuff is not only white on one side, but it also has lining still attached to it with overlocked stitches - meaning that I would have to cut it much narrower to even remove the lining, or unpick the stitches and have unsightly holes all through it. The material is also much thinner and frays a lot easier, so I would have to finish the edges off in some professional looking way, which is pretty hard without a sewing machine.


In the end, I decided to fold the fabric inside-out, sew down the one edge, and then turn it inside out so that it was like a nice 'tube', with the pretty fabric on the outside, then find some way to finish off the ends. And all without a sewing machine (I sound a touch bitter about the whole no-sewing-machine thing now, don't I?). Although this is a very basic project, I've documented it step-by-step, complete with the mistakes and observations I've made along the way. I hope it inspires you to try something similar, or maybe just find your own way to upcycle something that might have otherwise ended up in the trash!


DIY Scrap Fabric Headband (or Belt)


Step 1: Get Yo' Scrap Ready

As mentioned before, my scrap of fabric is about 7cm wide. I don't think you would want to go much narrower than this if you're using the sew-and-turn-inside-out method that I've done, but you can certainly go wider if you like. I would like to try a much wider one next time, if I can get a scrap the right proportions. As for length, I decided I wanted it to be long enough that I could tie it around my head with the knot at the front (so it looks a bit like a bow) but still short enough that I could tie it like a neat headband and have the tips tucked under my ponytail without being seen. After some experimenting with knots, I decided to go just over a metre long.


7cm wide and 103 cm long

Step 2: De-Stringaling

Basically, I just chopped away any stray stringalings that were hanging from the unfinished edge. Definitely not necessary for all fabrics, but this one seems to fray quite easily, so I wanted to make sure none of it was in the way.


Step 3: Iron, Lady

First I ironed the fabric nice and flat, so that it would be even when I folded it. Then...


I ironed it in half, inside-out, so that it would be easy to sew consistently. There was no real science or measuring that went into this (probably should have been), I just folded, ironed, and hoped for the best. It definitely wouldn't hurt to measure it to make sure you have a consistent width along the length of the headband! Oh, and in case you were wondering, my ironing board is a rainbow towel on the floor.


Step 4: Sew Good
I hand sewed down the length of the fabric, slowly and a little painfully. Not really. It didn't hurt, it just took forever. I used the overlocking as a guide for where to put my stitches - you can see in the picture - and from past experience, I would recommend you have some kind of guideline to sew along as well. No matter how straight I think I'm doing it, it's never as good as the real, measured thing, and it's a hell of a thing to try and fix up later. This took me a bit over an hour to do by hand, but I was multi tasking (practising my Spanish online and replying to emails), so it would have been a lot faster if I was focused more. Still, I would recommend that you at least watch TV or dodgy Youtube videos while you're doing it to break the monotony. Or, better still, use a sewing machine! Once I got to then end, I sewed along the edge to close it off, leaving the beginning side open for me to turn this thing inside out.


Step 5: Trimmings
Trim the excess fabric off, so your headband sausage isn't too stuffed.


Step 6: Inside inside inside inside inside outside
Now it's time to turn that sausage in on itself! The first thing I did was sew some reinforcing stitches at the remaining opening. I figured it would go through a bit of stress while I was turning it inside out, and I didn't want to undo all my hard work.


Then, I simply pulled the inside of the fabric tube to the outside, millimetre by millimetre. Ugh. This also took forever, but was extremely satisfying when I got to the end. Definitely a mindless activity to do while youtubing!


Step 7: Iron, Man
Ironing the headband flat after turning it inside out isn't necessary, and depends on what sort of look you're going for. I think I needed to do it, because I left the lining of the fabric on, and it got quite bunchy inside, so the headband was puffier than I wanted. After ironing, it wasn't too bad.
Note: The stitches in this picture aren't mine (I wish!) they're from whatever this piece of fabric's previous incantation was.


Step 8: Finish Him!
Last of all, I used my fingers and the ridiculous novelty scissors you get in a sewing kit to turn the unfinished tip of the headband in on itself.


After ironing it flat, I used my very best teeny fairy stitches to finish it off in a neat row. I was all out of white thread (my first choice) so I went with a saucy magenta. Woo woo!


RESULT
Wukka-wukka! We have a headband! It was a little longer than I had envisioned, but that turns out quite well, because it's long enough to use as a belt too! Definitely designed to brighten up an LBD or to go floral-clashing crazy.


Lessons Learned
- I think a wider piece of fabric would work better for a headband, although, I think the narrower piece works better for a belt - an unintended bonus, but it will help me to decide which I'm likely to use it for next time
- I should really buy a sewing machine. Santa Claus? Easter Bunny?  Anyone wanna bring me one?
- Upcycling is super cool
- As much as it pains me to say, there is real value in being precise and measuring everything for consistent results
- I would have sewed the stitches a little closer together if I made it again. It's not a big deal, but I can see the stitches, and the gaps between them. Probably not a big deal visually, but I'm worried that it's more likely to unravel because of this. I must remember this before I chuck the headband through the washing machine...

And that's all folks! If you have any questions, let me know, but in the meantime, happy sewing!

Vegan Laksa

Here's a sneak peek at my homemade Vegan Laksa paste - I'll definitely be posting the recipe for this one!

http://instagram.com/p/XtqglDysfM/


DIY Tutorial - Repair Jeans with a Ripped Crotch

Mmm, crotch holes. They sound a little more fun than they actually are, at least when it comes to denim. I'm not really one to get them myself, but Sam manages to work them into his jeans pretty easily - he'll assure you it's something to do with the size of his crotch region, and what kind of partner would I be if I denied that?

However the holes come to be, they're a bit of a pain - something I noticed when Sam donated an old pair of his low-rise, skinny jeans for me to wear through pregnancy. They fit like a dream, but the pelvic holes felt a little too risky - even though I'm hardly athletic enough to be flashing my nether regions to people at the moment, I thought it best for the general population if I fix them right away. Now that I've completed - and loved - the test run on my new jeans, the time has come to tackle a bigger beast. Sam's Absolute Favourite Pair Of Jeans.


What you need:

The afflicted denim article
Iron-on interfacing. If you don't have any lying around, buy the smallest quantity you can from your local fabric shop - you don't need much at all!
Thread in a colour similar to the denim you're working on
Sewing machine
Iron
Scissors

Difficulty

Easy

Time

Less than an hour

First, turn the jeans inside out and ready up your iron.


While your iron is heating up, cut out some interfacing in a size that will cover the offending holes and worn spots. It doesn't need to be accurate, you can always trim the excess away later.


Stretch your jeans over the ironing board as flat as you can, so you can easily iron the spot that needs repair.


Iron on the patches. Don't be afraid to double up on the interfacing to get good coverage or if your interfacing is much larger than the area that needs fixing - there are no hard and fast rules here!


Ready to go!


Once the interfacing looks thick enough to give good coverage to the area you're repairing, jump on the sewing machine. You want to zig zag stitch back and forth, and back and forth, and back and forth over the ripped parts and the parts that are worn through. I like to leave the needle in when I reach the end of a run, and then turn the jeans around and stitch back nice and close to where I did the last line, to minimise the loose threads you'll have to deal with.


Depending on how big or small the fabric injury is, you might find it more helpful to have the inside or outside facing up while you sew - or, do as I do, and try a combination of the two. I usually start by sewing the insides, then once I'm getting a bit of coverage on the interfacing I flip the jeans so I can make sure the hole is being adequately disguised from the front. 


If you find more areas that need TLC as you go, simply iron on some more interfacing and repeat until you're happy with the result!


Here's the repaired area from the outside:


And a close up...


And the inside...


You can trim any excess interfacing, or keep sewing until it's all stuck down. Then, bada bing bada boom! All done!


The thread that I've chosen matches these jeans quite well, but as you can see, it doesn't really matter on this pair - they're super distressed in a trendy way anyhow...I could have used practically anything to sew them up. It is nice to know it's effective even if you are trying to disguise the tattered nature of your denim, and even better - if the repairs are quite low in the crotch region (as they usually are) then you won't even see the stitching when you're wearing them.


If you're curious, here are a few pics of my pair post-repairs. I didn't match the thread to the denim as well with this pair, but it isn't noticeable at all when I'm wearing them - at worst, my crotch looks a tad bit shadier than usual (and if people are looking that closely, I think I have more than repair stitches to worry about?)


Sunday, June 23, 2013

Our Pregnancy Announcement

When we were ready to tell the world about the little person swimming in my belly, we knew we wanted to do it differently. Many friends of mine had either sent out a group SMS, posted a Facebook status, or put up a photo of their ultrasound. That just wasn't for us. First of all, having a baby is that LAST thing everyone expected us to do, so I was after something with some shock value! Second of all, we really want to try to instill as much creativity and humour in our child as we can, and why not get started before bub is even born?

We ran through a number of ideas before we decided to create a movie poster. We had come to fondly nickname the little one "The Thingy", and there was something of a horror movie feel about it - "The Thingy is coming!!!" was a bit of a catch cry for us in the early days! So, based on a few conversations with the people we had already told (and had absolutely sworn to secrecy!) we came up with a few lolz to sum up how we felt about everything at the time, and get the message across in a very box office fashion. Here's what we came up with:


Interestingly enough, some people took a minute to get the message - one friend, upon seeing the poster and being told it was our big news, exclaimed "Wow! You guys are in a movie??!". So, we sent it out to our friends and extended family with a little handwritten note explaining what we were up to and how excited we were. We worked through a long list of people that we wanted to tell in person, only sending letters to a few people a week and making them promise not to say a word to anyone. The best part was receiving a few new phone calls each week to say 'congratulations', instead of being bombarded with them all on the one evening!


Once we were exhausted with writing and posting letters (that kept us busy up until 20 weeks!) we finally did the big Facebook reveal and uploaded the picture to both of our pages. I definitely recommend this approach for everyone - it's great to know our 'thingy' poster has made it onto the fridges of our loved ones everywhere, and the poster is proudly displayed in our little one's room, ready and waiting for it's arrival!


Sewing Tutorial: Reusable Wipes and Burp Cloths

I've decided to use cloth nappies and reusable wipes when my little Thingy is born, but I have to be honest, I'm worried about giving it all up when things become too hard. When I asked my Mum if she used disposable wipes when I was a baby, she laughed. "Wipes? We used to call them face washers. I'm pretty sure they hadn't even invented disposable wipes then!". 

I'm really sold on how environmentally friendly and affordable it will be, but will I feel the same when I'm too sleep deprived to face ANOTHER load of washing? Really, only time will tell, but one thing I've decided to do to make it a little bit easier (and cuter!) is to make my own adorable wipes to reuse, instead of the plain white squares that you see on the market. I've also run up some burp cloths, which are basically the same but about double the length. Of course, you can adjust the measurements to make any size or shape that you like!

What you need: 
'Wipe' material of your choice (I've used towels, but you could also use flannelette, bamboo, microfibre, any other nice absorbent fabric)
'Decorative' material of your choice (this is just for looks, so any easy to handle material will do. Alternatively, you can use another absorbent material on this side in a different pattern to make your wipes handy on both sides!)
Complementary or contrasting thread
Sewing Machine
Pins
Measuring Tape
Chopstick, retractable pen or fat knitting needle

Difficulty:
Easy

Time:
Less than an hour per cloth

First, decide on the size you want for each of the cloths. The sizes I've used are as follows:

Burp Cloths
Material cut out - 42 x 21 cms or 16 1/2 x 8 1/2 inches (approx)
Finished product - 40 x 19 cms or 15 1/2 x 7 1/2 inches (approx)

Wipes
Material cut out - 21 cms x 21cms or 8 1/2 x 8 1/2 inches (approx)
Finished Product - 19cms x 19cms or 7 1/2 x 7 1/2 inches (approx)

*A note on materials* I've used a number of different materials, and get the impression that it is good to experiment a little to find out what works best for you and your bub. I've mostly used new towels on one side with a decorative cotton fabric on the other. I've also used flannelette on one side with new toweling on the other, and, for some extra eco-friendly ones, I've used an old towel (still in good condition, except for a hole that had been ripped in it) on one side with cut up cotton dress material on the other. You can also try things like microfiber, hemp or bamboo, but I've found those difficult to buy in my area and I'm too impatient to buy them online. If you're unsure which way to go, ask around your friends who have used cloth wipes, or have a look on some online forums or Facebook pages. My experience with other Mums is that they are more than happy to offer friendly advice, so don't be afraid to ask for it!

I would recommend washing and ironing your fabric BEFORE you begin - especially if you are using different materials for each side - to ensure they don't shrink to different sizes after their first use. Measure and cut the sizes that you need. If you have a specific wipes case or box that you would like them to fit into, then all you need to do is add approximately 2cm (or 1 inch) to the size that you want. When you're sewing, measure out 1cm (or 1/2 inch) seams around the edge, and you'll end up with the size that you need. 


On the wrong side of the 'decorative' fabric, measure and mark a 1cm (less than 1/2 inch) border around the entire piece of fabric. I do this on the decorative fabric rather than the wipe fabric simply because it will be easier to do. You may not need to measure and mark this section out, but as I'm a bit of a beginner seamstress, I find this helps a lot to keep my stitches nice and neat. 


Mark a section about 10cms (4 inches) wide for you to leave unstitched to turn the fabric inside out. I usually mark the beginning and end of this section clearly so that I can see it coming while I'm sewing.


Pin the wrong side of the decorative fabric to the wrong side of your wipe fabric. 


Start sewing at one end of the gap you will be leaving. Make sure to back stitch so that it doesn't unravel when you turn the fabric inside out. I use a nice small stitch for this part (the second smallest that my machine offers) to help the cloths survive the many washes that they will no doubt go through. 

Sew all around the edges of your fabric, along the lines you have marked. When you reach the other end of the gap you're leaving, be sure to back stitch again to make it nice and secure. 


*Tip* to make the corners nice and sharp, when you reach the end of a line, wind the sewing needle so that it's all the way in the fabric before you lift the pedal to turn the fabric to the new angle. Look how neat mine are! And I'm pretty terrible at corners!


Take out your pins, and then turn the cloth completely inside out through the hole that you've left. 


Using a blunt, pointed object (such as a chopstick or a fat knitting needle), poke the corners so they are neatly pointed out. Once you've sewn closed the gap, this will be near impossible to do!


To close up the hole that you've left, you can either slip stitch it by hand, or if you're lazy like me, you can sew a neat line with your machine close to the edge of the fabric. It all depends on how well finished you would like the product to look, and how much time you have handy. I don't mind that you can see where I've closed it up, but if I were giving to someone as a gift, I would probably take the extra time to hand stitch the edge closed. 


Using some chalk, mark a guideline of approximately 1.5 cms (just over 1/2 and inch). Again, this might not be necessary if you have a good eye for sewing, but I find it handy to keep me on track. 


Sew around the edges again using your chalk marks as a guide. I've used a larger stitch than before as it doesn't need to be as hardy; it's not for reinforcing the edges, just to give the wipes a more 'finished' look. I find that using a larger stitch hides the fact that my straight sewing lines aren't always exactly straight - but that will depend on how good you are on the machine! You can either do sharp corners again by ensuring the needle is all the way in before turning the fabric around, or if you're a more advanced sewer, you can sew curved edges. 

All done! Easy as that! 


Here's a pic of the reusable wipes that I've made - I have no idea what my favourite is, I love them all!


If you've made your own wipes and have any feedback on my design, I would love to hear from you. In the future I think I'll experiment with a few different materials to test their absorbency and how gentle they are. 

Update

Here's some that I made with one side flannel and one side towelling, and I also plan to make some that are double flannel - I'm told this is best for getting into nooks and crannies!